zRAM makes Linux lightening fast!

zRAM features and installation
This short blog / item is a look at the handy zRAM utility in Linux. zRAM is a Linux kernel module that creates a compressed block device in RAM. The ‘z’ is a symbolic reference to compression in Linux land. zRAM is relatively new to me but it is a fantastic way to make a system even more responsive – yes, a light-weight Linux distro can be made even faster with zRAM. I’m currently using it on a system with only 2GB of RAM running Lubuntu 20.04.6 LTS
How does zRAM work?
zRAM is most commonly used to create swap space in RAM but this swap space is compressed using high speed on-the-fly algorithms. It is particularly handy on systems with limited resources which may become very sluggish if using conventional swap partitions on the hard drive. It also frees up hard drive space and reduces read/write wear on your SSD or other hard drive device. zRAM will provide a very noticeable improvement in system speed and process handling.
How to set up zRAM
In my example zRAM is set up on a machine with only 2GB of RAM running Lubuntu 20.04.6 LTS. The setup process is very straightforward. All actions are carried out in the terminal.Text in blue is the terminal input.
Step 1
Check if you already have a zRAM setup running:-
cat /proc/swaps
If you see an output that contains zram then you already have it installed and running and it will look like this.
If zRAM is already running then there is no need to proceed with the next sections.
Step 2
If zRAM is not activated on your system you can now follow these steps. You now need to make sure that your existing conventional swap process is turned off. Nearly all Linux distros will install with a swap partition activated on the hard drive.
Open your fstab file in a text editor of choice (nano or vim)
sudo nano /etc/fstab
Comment out the line containing ‘swapfile’ by placing a hash at the beginning
Step 3
Turn off the currently running swapfile
sudo swapoff /swapfile
Step 4
Enable zRAM on Ubuntu / Debian and Mint
sudo apt install zram-config
Step 5
Enable systemd service for zRAM
systemctl enable zram-config
systemctl start zram-config
NB I have been experimenting with Linux AntiX, a radically slimmed down distro that does not include systemd – there is a way to install zRAM on AntiX but I will cover this in another post.
Reboot system
Now you should have zRAM enabled and running.
cat /proc/swaps
Should now have a zram entry listed
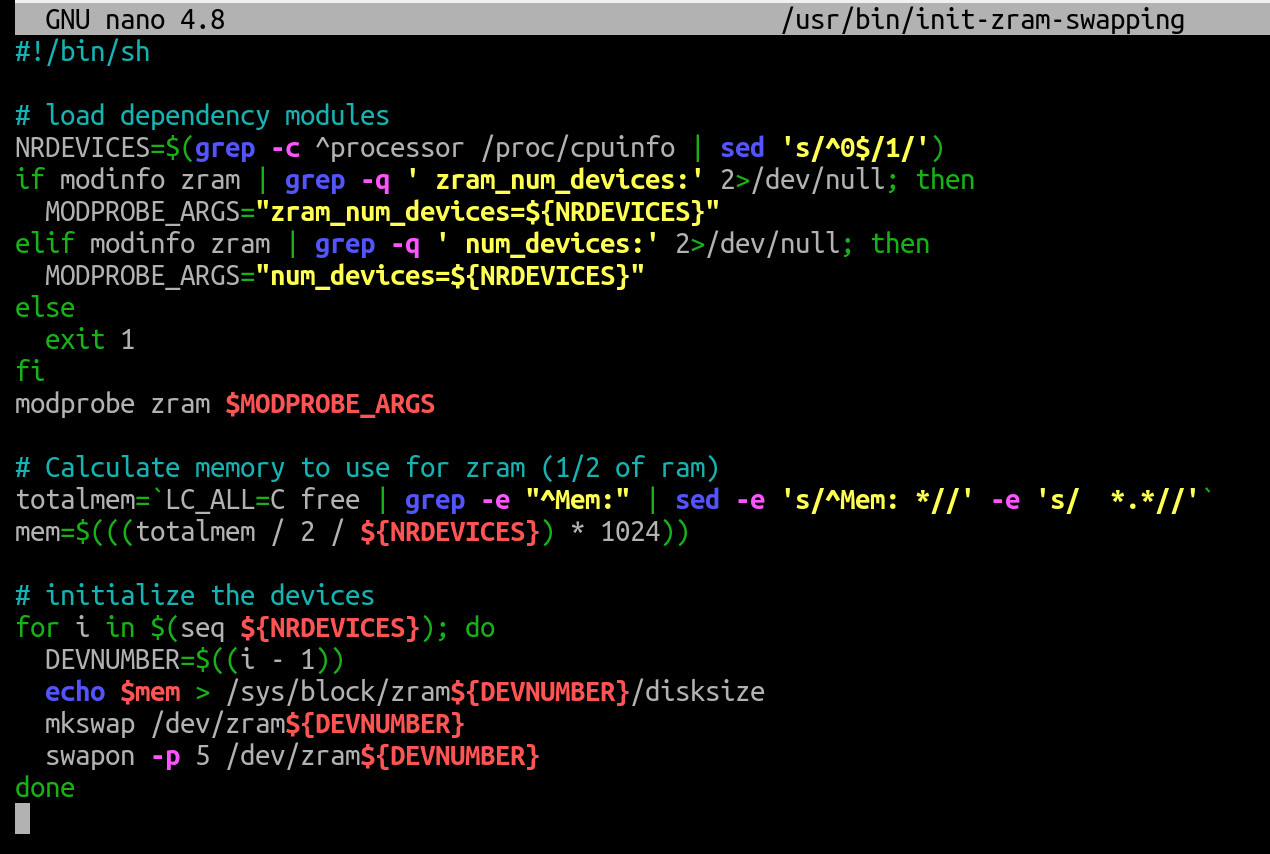
Now we can make a few adjustments if required. The zRAM process is controlled from the init-zram-swapping file
sudo nano /usr/bin/init-zram-swapping
Here you can change some of the functions and settings such as the algorithm used for compression though I would recommend leaving this at the default for your distro this is ‘zstd’ for Ubuntu.
Removing the /2 in the totalmem line will cause zRAM to use 100% of your RAM – this is not recommended unless you have less than 8GB of RAM. Even though I am only working with 2GB I have left this function as it is.
Change the Swapiness setting. Swappiness is simply a numerical parameter that tells the system how much to use the swap feature. So the higher the number the more your machine will use swap space for storing temporary files. Generally we want this to be set to 150 – this is the highest rating for swapiness which will in turn increase the speed of your system.
nano/etc/sysctl.conf
and add the following line at the bottom of the file
vm.swappiness = 150
save and reboot system
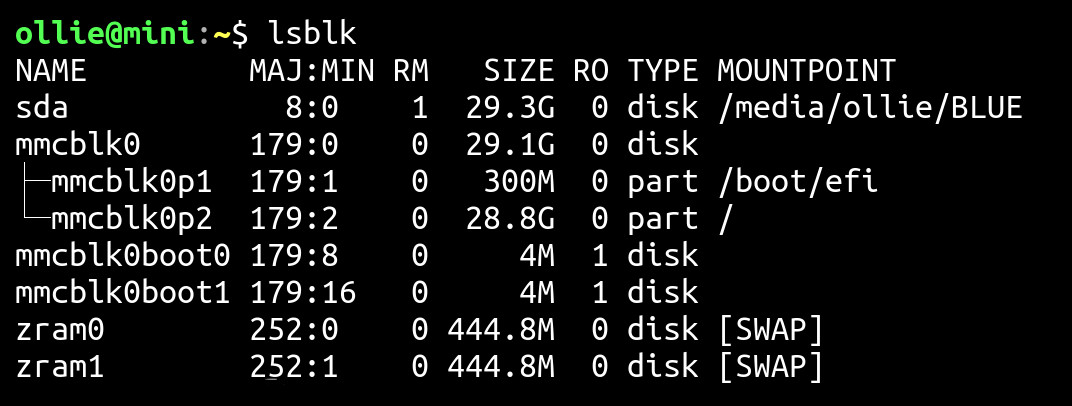
Lastly to check the operation of your zRAM swap partition you can have a look at lsblk (list block) and you should now see an output similar to this :-
lsblk
« Linux Lightweight Distro Reviews |
Prestburyweb


